
Building a Trading Bot Using a Simple Strategy
1)- Introduction
1.1 Accessing the Bot Builder
The Bot Builder is your creative space where you'll bring your trading ideas to life. To access it:
- From the user dashboard, navigate to the "Bot Builder" section.
- You'll be presented with the option to create a new bot or edit an existing one.
- Choose "Create New Bot" to start from scratch or select an existing bot for modification.

1.2 Understanding the Bot Creation Workflow
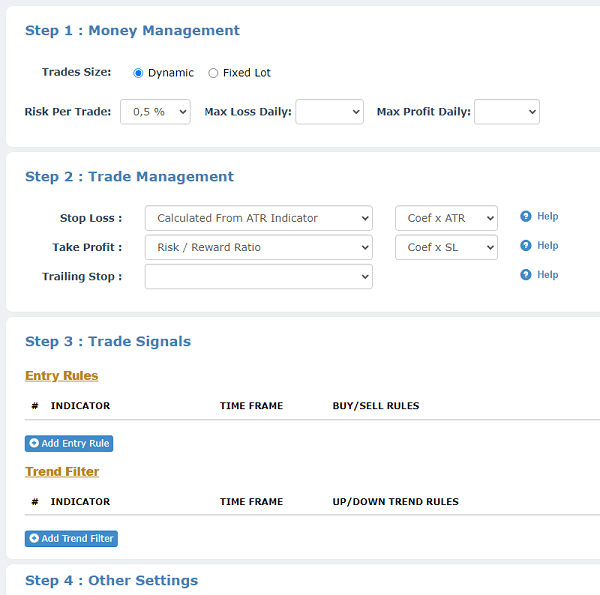
Creating a bot involves a logical sequence of steps, each contributing to the overall configuration of your trading strategy. The four main steps are as follows:
- Money Management: Set your risk parameters, trade size options (dynamic or fixed), and daily loss/profit limits.
- Trade Management: Configure how your bot manages individual trades, including stop loss, take profit, and trailing stop settings.
- Trade Signals: Define the criteria that trigger your bot's entry into the market, including entry rules and trend filters.
- Other Settings: Specify additional preferences like trading mode (automatic or manual), alerts, trading times, and days.
1.3 Bot Builder Interface Overview
The EA Builder interface is designed for both simplicity and flexibility. You'll find:
- Configuration Panels: Each step (Money Management, Trade Management, Trade Signals, Other Settings) has its own panel for parameter setup.
- Indicator Selection: Access a library of indicators that you can use to create your trading rules.
- Preview and Summary: A summary of your bot's settings, allowing you to review and make adjustments before generating the bot.
- Save and Generate: Save your progress and generate the final bot for testing or deployment.
2)- Step 1: Money Management Configuration
In this section, we'll explore the crucial first step in creating your trading bot: Money Management. Properly managing your risk, trade size, and daily limits is essential for maintaining a sustainable trading strategy. Let's dive into the details of configuring Money Management settings using the FX-eTrader platform.
2.1 Dynamic Lot vs. Fixed Lot: Choosing Trade Size
At the heart of effective money management is the choice between dynamic and fixed lot sizes. Here's what you need to know about each option:
- Dynamic Lot Size: This option adjusts the trade size based on your account's equity and risk percentage. The bot will calculate the appropriate lot size for each trade, ensuring consistency with your risk tolerance.
- Fixed Lot Size: With this option, you define a fixed trade size for each position. This can be advantageous if you have a specific risk amount you're comfortable with for every trade.

2.2 Setting Risk Per Order
Determining the risk per order is a crucial aspect of money management. This setting ensures that each trade aligns with your risk tolerance. Consider the following factors:
- Risk Percentage: Specify the percentage of your account balance that you're willing to risk on a single trade.
- Equity-Based Risk: If using dynamic lot sizing, the bot will adjust the trade size based on your specified risk percentage and current equity.
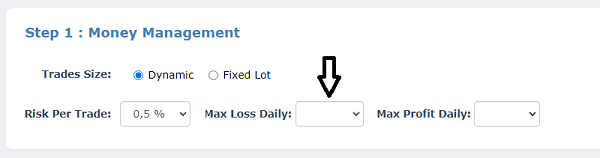
2.3 Configuring Maximum Daily Loss
To prevent excessive losses, it's important to set a maximum daily loss limit. This limit caps the total amount you're willing to lose in a single trading day.
- Setting the Limit: Define the maximum loss in your account currency that you're comfortable with in a given day.
- Impact on Trading: If the maximum loss is reached, the bot will stop trading for the day to prevent further losses.
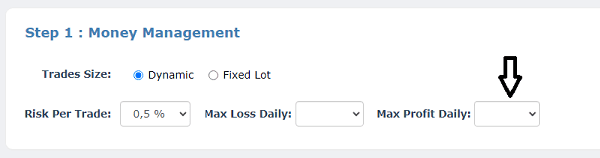
2.4 Defining Maximum Daily Profit
Just as you limit potential losses, it's wise to set a maximum daily profit target. This ensures that you lock in gains and prevent overtrading on profitable days.
- Setting the Target: Specify the maximum profit you aim to achieve in your account currency each trading day.
- Profit Protection: Once the target is reached, the bot will cease trading for the day, securing your gains.
After configuring these money management parameters, ensure that your risk, lot size, and daily limits align with your trading goals and risk tolerance.
3)- Step 2: Trade Management Configuration
In this section, we'll explore Step 2 of creating your trading bot: Trade Management. Effective trade management ensures that your bot executes trades in a controlled and disciplined manner.
3.1 Setting Stop Loss
A Stop Loss is a crucial risk management tool that helps limit potential losses on a trade. Here's how to configure it:
- Stop Loss Value: Define the price level at which the bot should close a trade to limit losses.
- Risk-Reward Ratio: Consider your risk-reward ratio to determine an appropriate Stop Loss value.
3.2 Defining Take Profit
Take Profit is a key parameter for locking in profits on winning trades. Here's how to set it up:
- Take Profit Value: Specify the price level at which the bot should close a trade to secure profits.
- Profit Target: Consider the potential profit you aim to achieve relative to your Stop Loss.
3.3 Configuring Trailing Stop
A Trailing Stop is a dynamic mechanism that adjusts the Stop Loss level as the trade moves in your favor. It helps secure profits while allowing room for market fluctuations.
- Trailing Stop Distance: Define the distance between the current price and the adjusted Stop Loss level.
- Trailing Stop Activation: Set a minimum price movement required to activate the Trailing Stop.
3.4 Understanding Trade Management Importance
Effective Trade Management ensures that your bot optimizes risk and reward for each trade, while adapting to changing market conditions. Proper use of Stop Loss, Take Profit, and Trailing Stop can prevent losses and capture gains in a disciplined manner.
4)- Step 3: Trade Signals Configuration
In this section, we'll dive into the heart of your bot's decision-making process—how it enters the market based on entry rules and trend filters. Let's explore the process of configuring Trade Signals using this platform.
4.1 Selecting Entry Rules
Entry rules define the conditions that must be met for your bot to open a trade. You'll select from a variety of indicators and criteria that align with your trading strategy.
- Indicator Selection: Choose from a library of technical indicators like Moving Averages, MACD, RSI, and more.
- Custom Criteria: Define your own conditions based on price patterns, candlestick formations, or other factors.

4.2 Configuring Entry Signals via Indicators
Once you've selected your indicators or conditions, it's time to set up the specifics:
- Indicator Parameters: Adjust the indicator's settings to align with your trading strategy.
- Buy and Sell Signals: Determine the criteria that trigger buy and sell signals based on your selected indicators. You will find a help link to the right of the selection field will show you a graph of the indicator with the chosen ridges.

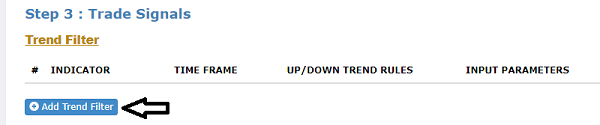
4.3 Implementing Trend Filters with Trend Indicators
Trend filters help your bot confirm the overall market direction before entering a trade. Trend indicators such as Moving Averages or ADX can be useful for this purpose.
- Trend Identification: Define how your bot identifies an uptrend, downtrend, or ranging market.
- Confirmation of Signals: Configure the bot to enter trades only when signals align with the identified trend.
4.4 Enhancing Bot Performance with Clear Signals
Clear and well-defined entry signals are essential for your bot's success. Avoid overly complex conditions and focus on simplicity and clarity. The goal is to minimize false signals and increase the accuracy of your bot's trades.
5)- Step 4: Other Settings Configuration
5.1 Choosing Trading Mode: Automatic or Manual
Selecting the trading mode defines how your bot operates within the market:
- Automatic Mode: Your bot executes trades automatically based on the configured settings and signals.
- Manual Mode: Your bot provides trade alerts, but you decide whether to execute the trades manually.

5.2 Enabling Mobile Alerts
Mobile alerts keep you informed about bot activity on the go:
- Push Notifications: Configure your bot to send alerts directly to your mobile device.
- Real-Time Updates: Receive instant notifications about trade executions, profits, and alerts.
5.3 Setting Up Email Alerts
Email alerts provide a convenient way to stay updated:
- Email Notifications: Configure your bot to send trade alerts and summaries to your email address.
- Trade Reports: Receive daily or weekly trade summaries for review and analysis.
5.4 Configuring Sound Alerts
Sound alerts offer an audio-based notification system:
- Audible Alerts: Enable sound notifications for specific events like trade executions or alerts.
5.5 Defining Preferred Trading Time
Specify the timeframes during which your bot is active:
- Trading Time: Define the start and end times for bot activity each day.
- Optimal Trading Hours: Align your bot's trading with periods of high market volatility or specific currency sessions.
5.6 Specifying Trading Days
Configure the days on which your bot operates:
- Trading Days: Select the days of the week when your bot is active.
- Weekend Trading: Choose whether your bot trades on weekends or remains inactive.
6)- Bot Creation Process
With all the settings configured, it's time to bring your bot to life, review your choices, and prepare for testing and potential deployment.
6.1 Overview of the Complete Configuration
Before you finalize your bot, take a moment to review all the settings you've configured:
- Money Management: Confirm your chosen trade size, risk per order, and daily loss/profit limits.
- Trade Management: Double-check your stop loss, take profit, and trailing stop settings.
- Trade Signals: Ensure your entry rules and trend filters are aligned with your trading strategy.
- Other Settings: Review your chosen trading mode, alerts, trading times, and days.
6.2 Reviewing Your Bot's Settings
Thoroughly review each section of your bot's configuration:
- Check for Consistency: Verify that your settings work together cohesively to create a logical and effective trading strategy.
- Risk Assessment: Ensure that your chosen risk parameters align with your risk tolerance.
6.3 Naming Your Expert Advisor
Give your trading bot a distinctive name that reflects its strategy or purpose:
- Bot Naming: Choose a name that is memorable and reflective of the trading approach or strategy.
- Organizational Clarity: Use a name that helps you identify the bot's purpose and settings at a glance.
6.4 Saving and Generating the Bot
With all settings reviewed and a name chosen, you're ready to generate your bot:
- Generate the Bot: Click the "Generate" button to finalize your bot's creation.
6.5 Conclusion
Congratulations! You've successfully created a trading bot tailored to your trading strategy and risk preferences. FX-eTrader empowers you to automate your trading while maintaining control and oversight. Remember that trading involves risk, and past performance is not indicative of future results. Stay informed, stay adaptable, and continue to evolve your strategies based on changing market conditions.
7)- Managing and Testing Your Bots
7.1 Accessing Your Created Bots
After generating your bots, you can easily access and manage them:
- Dashboard Navigation: Log in and navigate to the "Bot builder" section of your user dashboard.
- My bots: Here, you'll find a list of all the bots you've created.
7.2 Editing Bot Settings
Need to make adjustments to your bot's configuration? No problem:
- Edit Option: Select the bot you want to modify, and click on the "Edit" button.
- Configuration Panels: You'll be taken back to the EA Builder interface, where you can adjust settings as needed.
7.3 Deploying Bots on Demo Accounts
Demo accounts provide a risk-free environment for testing your bots under real market conditions:
- Demo Account Setup: Open a demo trading account with a broker compatible with Metatrader platform.
- Bot Activation: Deploy your bot on the demo account and observe its performance.
- Real-Time Simulation: The bot will execute trades as per its configuration, but with virtual funds.
7.4 Moving to Live Trading
When you're ready to trade with real money, follow these steps:
- Broker Selection: Choose a reputable broker that offers live trading with Metatrader compatibility.
- Live Account Setup: Open a live trading account and fund it with an amount you're comfortable risking.
- Gradual Transition: Begin with a small portion of your capital to assess your bot's behavior in live conditions.
7.5 Regular Monitoring and Adjustment
Whether in demo or live trading, continuous monitoring is key:
- Performance Evaluation: Regularly review your bot's performance metrics and adjust settings as needed.
- Adaptation: Adapt your bot to changing market conditions and refine your strategy based on real-time insights.
7.6 Conclusion
Effective bot management, testing, and deployment are essential for successful algorithmic trading. Our platform empowers you with the tools to fine-tune your strategies and adapt to market dynamics.
8)- Glossary of Terms
- Algorithmic Trading: Also known as algo trading or automated trading, it involves using computer algorithms to execute trades based on predefined criteria and strategies.
- Backtesting: The process of testing a trading strategy using historical data to evaluate its performance and profitability.
- Bot: Short for "robot," a bot refers to an automated trading program or Expert Advisor (EA) that executes trades based on predefined rules.
- Demo Account: A simulated trading account that allows you to practice trading strategies using virtual funds without risking real money.
- Entry Signals: Conditions or criteria that trigger the opening of a trade based on indicators or other factors.
- Expert Advisor (EA): A software program that runs on a trading Metatrader platform to automate trading strategies.
- Indicator: A visual or mathematical representation of market data used to analyze trends, patterns, and potential trading opportunities.
- Manual Trading: Executing trades manually by the trader's decision and input, without automation.
- Money Management: The practice of managing risk and allocating capital to trades to ensure long-term sustainability.
- Point: A unit of measurement in the forex market, representing the smallest price movement that can occur in an exchange rate.
- Risk-Reward Ratio: The ratio of potential profit to potential loss on a trade. It helps traders assess the potential reward relative to the risk taken.
- Stop Loss: An order placed to automatically close a trade at a certain price level to limit potential losses.
- Take Profit: An order placed to automatically close a trade at a certain price level to secure profits.
- Trailing Stop: A dynamic Stop Loss that adjusts as the trade moves in the trader's favor, helping to lock in profits while allowing room for market fluctuations.
- Trend Filter: A tool or indicator used to identify the overall market direction (upward, downward, or ranging) before making trading decisions.